UI/UX & Gameplay Programmer
ATLAS
Platforms
PC, Xbox
Role
Senior UI/UX & Gameplay Programmer
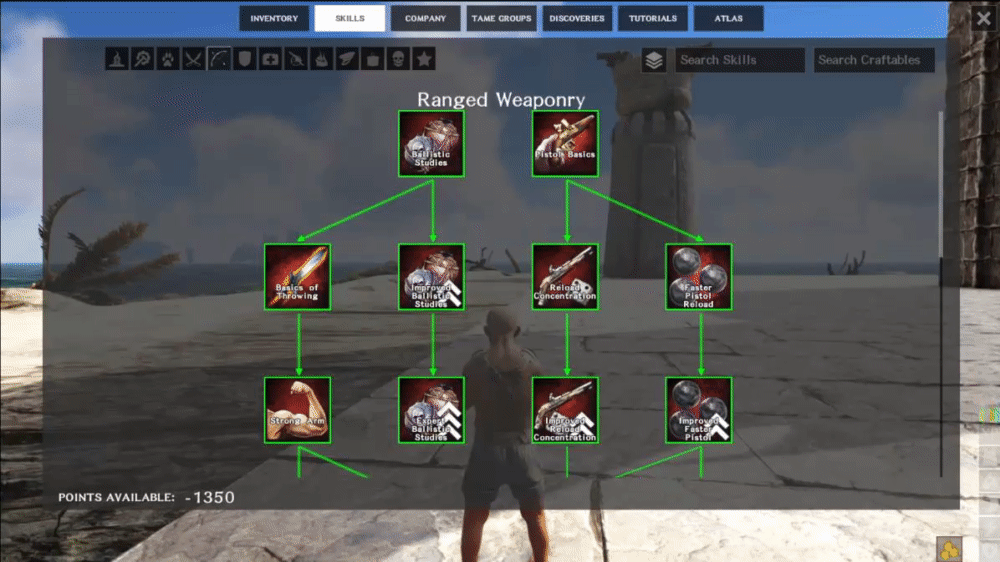
In ATLAS, we included multiple skill trees across different “disciplines” that cover a wide range of unlockable features ranging from crafting the parts necessary to build a house or even a ship to unlocking the ability to use firearms.

In order to support including these skills in game, we needed a menu that allowed players to see, interact with, and unlock these skills. In order for this menu to meet the requirements of what we wanted to accomplish, it needed to meet the following criteria:
-
It needed to be completely dynamic, which is to say, the tree would be generated and displayed at runtime.
-
It needed to display the tree in a way that the relationship between the skills was easy to understand. Such as a specific skill being required to unlock another.
-
There was no guarantee that all skill trees across all disciplines would be derived from one root skill, so it needed to support drawing multiple trees in a shared space.
All of these requirements stemmed from the fact that to top it off, the skill tree needed to support including user generated skills in the form of downloadable mods.
With all of these constraints in place, this is how I went about implementing it.
HOW TO ADD THE TREES TO THE SCREEN
The first hurdle to overcome was figuring out how the tree should be displayed. In order to make the skill tree readable,I decided to draw lines between skills and their prerequisites. This meant that there needed to be ample space between skills to add these lines.
With that in mind, I decided that treating the space like a grid was the best approach. This way the skills could be spaced out on this grid.
It is worth noting that while the game used the term “Trees”, in computer science terms they are actually graphs. This is because it is possible to have a skill that requires more than one unlocked prerequisite (i.e. nodes with more than one parent).
FIGURE OUT SPACING
The first step was to find a way to make sure the skill nodes could be spaced evenly. This spacing was necessary to generate negative space around the nodes.
I also needed to determine the max number of spaces a row would hold while ensuring the skill widgets would be large enough to be readable. I knew the number needed to be odd to ensure that, in the event of having only a single skill in a row, it could be placed in the center. The final number that met this criteria was 13 widgets.

With the magic number of 13 empty “slots”, I knew the max number of “visible” skill nodes I could hold in a single row while having empty spaces between them was 7.
To leave room for lines to be drawn between parent and child nodes I anticipated I would need to skip a row after every row with entries (see example below).

DETERMINE THE PROPER ROW FOR EACH SKILL
With rows set up, I needed to figure out how to place the skill nodes within the tree. Rows were made up of 13 spaces, as mentioned above, and pseudo columns would be created by the location of the visible nodes within the rows’ widgets.
My next task was to sort the skills by determining their graph depth, and place them into the proper row accordingly. Graph depth was determined by calculating the number of nodes a given node would have to traverse to reach the root of the graph from all possible paths. The max number was used so a parent would always point to a child in the row below, never a row above. The depth of a given node directly correlated to the row the skill would be placed in, as seen in the image below.
.png)
Given the limit of a maximum of 7 skills per row, there also needs to be a way to handle the case where more than 7 skills were determined to be at the same depth. This would mean they would all need to go on the same row.

To achieve this, I would turn the subsequent row below the current row into an “overflow” (i.e. if Row 0 had more than 7 skills, then I would create a second Row 0 below the first, as shown in the image below).

POPULATE SKILLS
Once the graph depth was determined, the skills were placed into every other widget in the proper row.

Then, I pre-computed a sub-grid to aid in the pathfinding for the arrows that would be drawn between parent and child nodes, taking into account skills that had been added.

DRAW LINES BETWEEN NODES
After computing the sub-grid, by using the A* pathfinding algorithm, paths were generated between each parent node to respective child nodes, and resulting coordinates were passed to the overlay widget.

The lines between the nodes were then rendered on the overlay, and their render translation was adjusted based on scroll offset.

FINAL RESULT